
아래 내용은 스프링 가이드를 번역으로 제공 하였음.. 참고로 번역 품질이 좋지 못하니 꼭 아래 사이트 참고 할 것
https://spring.io/guides/gs/serving-web-content/
------------------------------------------------------------------------------------------------------------------------
이 가이드는 스프링을 사용하여 "Hello, World"를 개발 하는 과정을 안내하고 있다.
무엇을 만드는가?
너는 정적임 홈페이지와 HTTP GET 요청들을 받을 수 있는 어플리케이션을 만들수 있을 것이다.
http://localhost:8080/greeting. <= 여기에서.
그것은 HTML을 보여줄 수 있는 웹페이지로 응답 할 것이다. HTML의 바디는 "Hello, World"라는 인사가 포함될 것이다.
너도 쿼리 파라미터인 name 파라미터 옵션을 주어서 인사를 제작 할 수 있다.
이 URL음 아마도 http://localhost:8080/greeting?name=User 같이 될것이다.
name 파라미터 값이 World의 값이 덮어써지고 "Hello, User"로 컨텐츠가 변경되서 응답 받을 것이다.
무엇이 필요하나?
- 약 15분 정도의 시간
- 좋아하는 텍스트 에디터 or IDE(이클립스, intellij 등)
- JDK 1.8 또는 그 이후 버전
- Gradle 4+ 또는 Maven 3.2+
- 당신의 IDE에 코드를 직접 임포트 할 수 있다.
이 가이드를 완료 하기 위해서 어떻게 해야 하나?
대부분 스프링 시작 안내서처럼 너는 각각의 상태 또는 너에게 이미 익숙한 기초 셋업 상태를 시작하거나 완료 할 수 있다. 어느쪽이든 당신은 작업 코드가 완료하게 됩니다.
처음부터 시작하려면 스프링 초기화로 시작으로 가세요.
기본을 스킵하기 위해서는 아래에 처럼 하세요.
git clone https://github.com/spring-guides/gs-serving-web-content.git- 모두 끝났을 때 gs-serving-web-content/complete에 코드와 대비해서 결과를 체크할 수 있다.gs-serving-web-content/initial 로 가세요.
- 웹 컨트롤러 만들기 로 가세요.
스프링 초기화로 시작
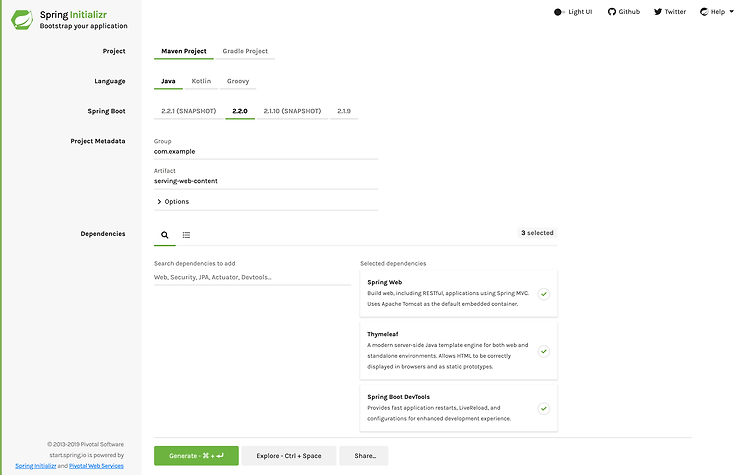
모든 스프링 어플리케이션을 위해서는 스프링 초기화를 사용해서 할 수 있다. 이 초기화는 어플리케이션을 위한 모든 의존성들을 가져오기 위한 빠른 방법을 제공 하고 많은 설정을 할 수 있다. 이 예제는 Spring Web, Thymeleaf, and Spring Boot DevTools 의존성들이 필요로 한다. 아랭 제공된 이미지에서는 샘플 프로젝트를 만들기 위한 초기 설정을 보여준다.

| 이전의 이미지는 빌드툴로 선택된 메이븐으로 초기화 설정을 보여준다. 그래들도 사용할 수 있다. 그것은 Gruup 필드와 Artifact필드에 각각 com.example 와 serving-web-content 값을 보여준다. 이 샘플의 나머지 부분에서 이 값을 사용한다. |
아래에 메이븐을 선택 했을 때 만들어지는 파일인 pom.xml 을 보여준다
<?xml version="1.0" encoding="UTF-8"?>
<project xmlns="http://maven.apache.org/POM/4.0.0" xmlns:xsi="http://www.w3.org/2001/XMLSchema-instance"
	xsi:schemaLocation="http://maven.apache.org/POM/4.0.0 https://maven.apache.org/xsd/maven-4.0.0.xsd">
	<modelVersion>4.0.0</modelVersion>
	<parent>
		<groupId>org.springframework.boot</groupId>
		<artifactId>spring-boot-starter-parent</artifactId>
		<version>2.2.2.RELEASE</version>
		<relativePath/> <!-- lookup parent from repository -->
	</parent>
	<groupId>com.example</groupId>
	<artifactId>serving-web-content</artifactId>
	<version>0.0.1-SNAPSHOT</version>
	<name>serving-web-content</name>
	<description>Demo project for Spring Boot</description>

	<properties>
		<java.version>1.8</java.version>
	</properties>

	<dependencies>
		<dependency>
			<groupId>org.springframework.boot</groupId>
			<artifactId>spring-boot-starter-thymeleaf</artifactId>
		</dependency>
		<dependency>
			<groupId>org.springframework.boot</groupId>
			<artifactId>spring-boot-starter-web</artifactId>
		</dependency>

		<dependency>
			<groupId>org.springframework.boot</groupId>
			<artifactId>spring-boot-devtools</artifactId>
			<scope>runtime</scope>
			<optional>true</optional>
		</dependency>
		<dependency>
			<groupId>org.springframework.boot</groupId>
			<artifactId>spring-boot-starter-test</artifactId>
			<scope>test</scope>
			<exclusions>
				<exclusion>
					<groupId>org.junit.vintage</groupId>
					<artifactId>junit-vintage-engine</artifactId>
				</exclusion>
			</exclusions>
		</dependency>
	</dependencies>

	<build>
		<plugins>
			<plugin>
				<groupId>org.springframework.boot</groupId>
				<artifactId>spring-boot-maven-plugin</artifactId>
			</plugin>
		</plugins>
	</build>

</project>
아래에 그래들을 선택 했을 때 만들어지는 파일인 build.gradle 을 보여준다
plugins {
	id 'org.springframework.boot' version '2.2.2.RELEASE'
	id 'io.spring.dependency-management' version '1.0.8.RELEASE'
	id 'java'
}

group = 'com.example'
version = '0.0.1-SNAPSHOT'
sourceCompatibility = '1.8'

configurations {
	developmentOnly
	runtimeClasspath {
		extendsFrom developmentOnly
	}
}

repositories {
	mavenCentral()
}

dependencies {
	implementation 'org.springframework.boot:spring-boot-starter-thymeleaf'
	implementation 'org.springframework.boot:spring-boot-starter-web'
	developmentOnly 'org.springframework.boot:spring-boot-devtools'
	testImplementation('org.springframework.boot:spring-boot-starter-test') {
		exclude group: 'org.junit.vintage', module: 'junit-vintage-engine'
	}
}

test {
	useJUnitPlatform()
}
웹 컨트롤러 만들기
웹사이트를 만들기를 접근하는데는 HTTP 요청은 컨트롤러로 다룰 수 있다. @Controller 어노테이션으로 컨트롤러를 알보게 할 수 있다. 아래의 예제는 GreetingController 를 View의 이름 (이 경우 greeting)을 반환함으로써 /greeting을 위한 GET 요청을 다룬다.
View는 HTML 켄텐츠를 렌더링을 하기위해서 책임지고 있다. 아래의 리스트(src/main/java/com/example/servingwebcontent/GreetingController.java)에는 컨트롤러를 보여준다.
package com.example.servingwebcontent;

import org.springframework.stereotype.Controller;
import org.springframework.ui.Model;
import org.springframework.web.bind.annotation.GetMapping;
import org.springframework.web.bind.annotation.RequestParam;

@Controller
public class GreetingController {

	@GetMapping("/greeting")
	public String greeting(@RequestParam(name="name", required=false, defaultValue="World") String name, Model model) {
		model.addAttribute("name", name);
		return "greeting";
	}

}
이 컨트롤러는 간결하고 간단하지만 많은 일은 할 수 있다. 차근차근 진행하면 됩니다.
@GetMapping 어노테이션은 greeting()를 매핑한 /greeting로 HTTP GET을 요청을 보장한다.
@RequestParam 은 greeting() 메서드의 파라미터인 name을 스트링 파라미터 name 쿼리 값으로 바인딩 한다. 이 쿼리 스트링 파라미터는 필수값은 아니다. 이 요청을 넣지 않는다면 디폴트값으로 World가 사용된다.
name 파라미터의 값은 Model 오브젝트로 추가 된다. 궁극적으로 뷰 템플릿으로 접속 하기 위해서 만든것이다.
바디 메서드 구현은 HTML의 서버사이드 렌더링을 수행하는 뷰 기술(이 경우는 Thymeleaf)로 신뢰된다.
Thymeleaf은 greeting.html 템플릿을 파싱하고 컨트롤러에서 설정한 ${name} 파리미터의 값을 랜더링을 해서 th:text로 평가되어진다.
아래의 리스팅(src/main/resources/templates/greeting.html)을 greeting.html 템플릿을 보여준다.
<!DOCTYPE HTML>
<html xmlns:th="http://www.thymeleaf.org">
<head>
    <title>Getting Started: Serving Web Content</title>
    <meta http-equiv="Content-Type" content="text/html; charset=UTF-8" />
</head>
<body>
    <p th:text="'Hello, ' + ${name} + '!'" />
</body>
</html>
| classpath에 Thymeleaf가 있는지 확인 해야 한다. (artifact 출처: org.springframework.boot:spring-boot-starter-thymeleaf) GitHub에 있는 initail이나 "complete"샘플에 이미 있다. |
----------------------------------------------------
기본 설정 내용이 마무리 되어서 이후로는 2번 포스팅으로 가니 참고 바랍니다.

ChatGPT, 블록체인, 자바, 맥북, 인터넷, 컴퓨터 정보를 공유합니다.
포스팅이 좋았다면 "좋아요❤️" 또는 "구독👍🏻" 해주세요!
